Monday, August 31, 2009

Plain-Jane Sweater Make-Over


I don't usually feel wistful about the days before children. I love getting to spend time with them each day. I love watching them grow up. I love teaching them about cooking and reading and sharing. But I do sometimes miss the care-free feeling I had before my life of responsibility. Especially when it comes to money and clothes. Or money for clothes, to be more specific. I used to shop. I used to be a pretty cute dresser. I actually used to buy things at Anthropologie at full price! *Sigh*

Whenever my mom comes to visit, she always has a suitcase full of goodies for everyone. This time, she brought me the remains of a coral-colored sweater. It originally had a cute faux shirt underneath that was too low-cut for her taste, so she bought two, snipped and pinned, and gave me the extras. I was instructed to "make it look like something from Anthropologie." Did I achieve my goal? I think it looks pretty cute!


Materials:
  • 1 sweater
  • coordinating fabric--I had probably 1/8 of a yard and that worked just fine; I have lots left over
  • thread to coordinate with your sweater and fabric
  • needle
  • sewing machine (optional)
  • enough buttons to replace the ones on the sweater, if you choose to replace them
Instructions:
  • Wash, dry, and iron your fabric. Wash, dry, and iron your sweater too if it isn't already clean.
  • Cut out a small piece of fabric, 1 x 1/2", and fold it in half so that it is now a small square. Position your frayed flower where you want it on your sweater, and place your fabric square in the same spot on the inside of the sweater. This will help your flower be more stable.

    Thread your needle and tie a knot on one end. Starting inside the sweater, sew your flower on. Make sure you are sewing all 3 layers--the flower, the sweater, and the little square--together, and make sure your stitches aren't showing on the front of the flower. You can stop whenever you feel like your flower is stable enough. Finish off your stitches with a knot and trim your thread.


  • Snip any buttons that you want to replace off your sweater. Sew on the new buttons. It should be pretty obvious where the old buttons were, but if not, check your button positions with the coordinating button holes before attaching them.


  • To figure out how big you want your cuff ruffles to be, measure the opening on your sleeve and double it, then add 2 more inches. That is your length measurement. However wide you want the ruffles to be (mine are 2 inches), add 2 more inches. That is your width measurement. If you are like me and think it might look cool to have the open end frayed, you only need to add 1 inch. We'll see in a few weeks how good an idea that is! Here's an example of ruffle measurements: my sleeve opening is 9" total. 9 x 2 = 18 and 18 + 2 = 20. I need to cut two strips of fabric that are 20" long. I want ruffles that are 2 " wide. 2 + 1 (raw edge) = 3. My strips need to be 3" wide. If I wanted a hemmed edge, they would need to be 4" wide.
  • Hem as many of the edges of your fabric strips as you want by folding over the raw edge 1/2", pressing it with an iron, folding it over another 1/2", and pressing it again. Sew the fold to create a nice hem.
  • Gather each strip by following the same steps as you used to make the frayed flower. Stop after you pull the thread to bunch up the fabric.
  • An easy way to make sure your ruffle is evenly bunched AND the right length is to pin both ends the finished distance apart on the couch or ironing board and then spread out the gathers evenly. This way, neither end is moving; you're just pushing the ruffles back and forth over the same few inches. You want your finished ruffle to be the same length as your entire sleeve opening.


  • When you have your ruffles spaced out and the correct length, press the fabric gently with an iron to help it hold its shape.
  • Carefully pin the ruffle onto the opening of your sleeve. I lined up the seam on my ruffle hem with the seam on my sleeve cuff and pinned it there, all the way around the sleeve opening.
  • Sew the ruffle onto the sleeve. If you are lucky you have a sewing machine that will let you do this. If you don't have a machine, or if you can't figure out how to make the sleeve fit on your machine, just sew it on by hand. It won't take very long! Once the ruffle is sewn on, you can remove the thread you used to gather it.
  • Gather, press, pin, and sew the other ruffle onto your sweater.

Wednesday, August 26, 2009

Tote-ally Crazy!


I've really gotten swept up in the tote craze this summer. I can't even tell you how many blog posts I've read on customizing tote bags. But I've loved every single one of them! We've had a couple of birthday parties to go to this summer, and that means we've had a couple of birthday presents to think up, and THAT means we've had a couple of tote bags to prettify.
The first birthday party was for a 4-year-old. Being the mom of a few little ones who have plenty of toys already, I didn't want to get this little princess another toy. So we found a cute, hot pink mini tote bag at the craft store, painted on a sunny yellow "j", and filled it with art supplies.

The second birthday party was for a 29-year-old. I wanted to get her something cool and useful, so a grocery-sized tote seemed like the perfect fit. I had a hard time deciding what to put on it. I thought putting the birthday girl's initial seemed a little junior high-ish (although I love a good monogram), and I didn't want to put a peace sign or the earth or the recycling triangle. And then it hit me...a raven!

My husband asked my why I put a raven on Annie's bag. Duh, it's because I thought it would look cool, which I think it does! I googled "raven clip art", looked at the images, and found exactly what I had in mind. You can find it by clicking here. Incidentally, I filled this one with italian sodas, biscotti, herbed flatbread crackers, and a bouquet of flowers.

To make both bags, I used the directions for freezer paper stencils posted on Inchmark here. On both bags I applied 2 coats of paint, letting the first dry before adding the second.

Tuesday, August 25, 2009

Wedding Photos

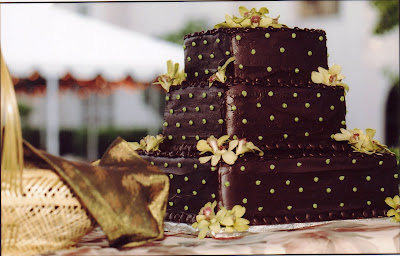
Why am I posting photos from my wedding, which was almost 5 years ago, on my crafting blog? Because I want to win a contest, the prize from which is a beautiful print from an artist whose work I've admired for over a year now. And because I loved my wedding, so looking back on it is always fun! Without further ado...


All pictures by Ellie Patrick Photography

PS--These pictures were taken with film! No Photoshopping or anything; just lovely photos!

Monday, August 24, 2009

Alphabet Wall Art


This project has been in the works for so long now. I first got the idea from my friend Meghann sometime last year, then put it off over and over and over again. When I finally got around to getting the materials, the craft store was out of what I needed, so I bought my second choice materials, which kind of took the wind out of my sails! But now, after many months of procrastination, it is finished. I chose to spell out my children's names, but you could do letters of the alphabet, a different word that goes with the theme in their bedroom, or even numbers. It is such a quick and easy project, and there's nothing like instant gratification when it comes to home decor!

The materials will differ slightly based on what you have available to you. The important thing to remember when gathering materials is that your letters, paper, and frames all have to coordinate size-wise. It won't do you any good to buy enormous letters if the only frames you can find are 5x7"! I am lucky enough to have a fantastic craft store (Ben Franklin Crafts) nearby that carries 12" square frames in the color I wanted--white--for only $6 each. So I bought fairly big letters that were also already painted white (Thank You Walmart!) and scrapbooking paper that was 12" square. I also chose to use the same size frame and letter for each panel and only varied the pattern on the paper, but it would probably look cute and whimsical to use different-sized frames and letters.

Materials:
  • 1 inexpensive picture frame per panel
  • 1 wooden letter per panel
  • paint, optional (only if your frames and letters are not already the color you want)
  • 1 piece of scrapbooking paper per panel
  • double-stick tape
  • glue (I used Tacky Glue)
  • measuring tape or ruler, optional
  • pencil
Instructions:
  1. If your picture frames and/or letters are not the right color, paint them and allow them to dry completely. When I finally bought my materials, the craft store didn't have enough white frames, so I bought some that were black and spray painted them. It took many coats, but they look pretty good.
  2. If your paper is not already the appropriate size for the frames, carefully cut it to the right size. The cardboard insert from a picture frame makes a great template.
  3. Remove backing, cardboard, and glass from 1 ready-to-go picture frame. You can find some other use for the glass, but keep the backing and the cardboard.
  4. Apply double-stick tape to the back of 1 piece of paper. I put 1 piece of tape on each edge, and then made a big X in the middle, so I used 6 pieces of tape on the back of each piece of paper. Place the paper right-side up on top of the cardboard insert from the frame and gently press them together. Make sure there are no wrinkles or bubbles. Put the cardboard/paper sandwich back in the picture frame and replace the backing. You should now have a lovely framed piece of patterned paper!
  5. Figure out where your letter is going to go on the paper and very lightly mark the top or bottom edge with the pencil. I just eyeballed it, but you could always measure.
  6. Carefully apply glue to the back of 1 wooden letter. You do not want glue oozing out when you stick the letter onto the paper, so apply enough to make the letter stick, but no more. Place the letter glue-side down onto the paper in the marked spot and gently press down. Allow to dry completely.
  7. Repeat steps 3-6 for the remaining letters.
  8. Hang on wall!