Monday, December 21, 2009

Holiday Baking (aka, Why did I do this to myself??)


I have another blog, one that is all about cooking. It was my first blog and I love it. A few days before Thanksgiving this year, I thought it would be neat to do 25 days of holiday baking posts. From scratch. Without any preparation. Like zero.

I have felt at times like I was in way over my head, but now I have a bunch of holiday recipes in one place. Some are old family favorites, while others are brand new, never-before-tried recipes that begged to be made. I hope you enjoy them! Happy Holidays!

Click HERE to browse my 25 Days of Holiday Delights project!


Brown Paper Package Exchange Update


Christmas is only a few days away! I've heard from lots of the participants of the BPPE. Many packages have been shipped, a few have been received, and lots of fun has been had. To those of you that haven't sent your packages yet, please get a move on! Although I think most people had Christmas in mind, don't forget the old saying, "A New Year's package is better than no package."

My sweet mom doesn't have a blog, so I told her I'd post pictures of her package for her. I think she was the first to receive her package out of all the participants (go Sheila!), and all of my sisters and I were home for Thanksgiving when she opened it! Here's what my mom writes about her gifts:


The week before Thanksgiving, a knock at the door got the dog barking and the birds chirping! My box from the Brown Paper Package Exchange had arrived, to great fanfare! All of my daughters were already home for the holiday, and we gathered with great excitement to open my treasure box! We were impressed with how quickly Sheila sent it- and her promptness set a good example for us and inspired us to do likewise! Opening the lovingly prepared gifts was a thrill, and I was overwhelmed at the wonderful assortment of treats!


Sheila sent me an assortment of lovely, self indulgent treats: A deliciously scented ginger candle, a pair of beautifully fashioned beeswax tapers, an earthenware teacup painted with a delightful little bird, some decadent "dark chocolate" hand and body lotion, and a huge and hugely fragrant bar of handmade vanilla soap!


More fun surprises! Sheila also included in her fantastic gift box: Several notebooks she made just for me! A pack of festive holiday recipe cards with gift labels, a set of adorable vintage postcards she made, and a LARGE bar of gourmet chocolate!


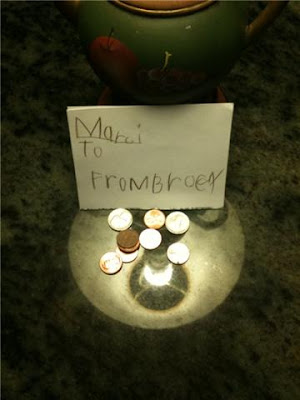
But... in all this loveliness, one gift stood out, and made me happiest of all!
Sheila's little grandson, 6 year old Brock, was visiting the day she put my gift box together. Sheila wrote that Brock "wanted to send you his own gift"- which he did! He wrote my name on an envelope in his sweet six year old handwriting, and carefully placed some money "from his money box" in the envelope! If that isn't the purest example of the Christmas Spirit, I don't know what is! Sheila, thank you for all of my lovely gifts, but especially for sharing your dear little grandson with me!

Friday, December 18, 2009

Flower Fairy Button Ornaments


We decided to sign up for The Crafty Crow's Kids' Ornament Swap this year. It sounded easy: you and your kids make a few ornaments in keeping with the year's theme, then send them to your swap partners, who in turn send you ornaments they've made with their kids. Our theme this year is Fairy Tales, and for some reason, I got this idea in my head immediately that we should make handprint butterfly ornaments on shrinky dink plastic.

We ran into several problems. First, I couldn't find the clear shrink plastic; they were out of it and only had bright white. But I didn't want to procrastinate, so we went ahead with gosh-awful white plastic. Then, even though I knew they would end up small and cute, the handprint butterflies had to start out pretty big, and my kids pooped out with the coloring about halfway through the first of 5! Last but not least, they simply weren't that cute in the end. So we completely scrapped that idea and found new inspiration in the form of button ornaments from Martha Stewart!

These were so easy and turned out so cute! Martha originally made Santas, snowmen, and reindeer, and we made what we dubbed "Flower Fairies." You can pretty much make whatever you want as long as you can find buttons in the right colors! I want to do a Nutcracker set, complete with Nutcracker, Clara, and Mouse King. Junior Society even posted a project using the same idea to make a button menorah! I think our entire tree might end up being button ornaments!


And as of yesterday, we have received all of our ornaments from the Swap. Sometimes in swapping I feel like I get the short end of the stick (am I the only one who feels that way?). I put so much love and thought into my packages, and sometimes what I get in return has that thrown-together-with-no-thought feel. With this year's Kids' Ornament Swap, I feel like we struck swapping gold! The ornaments we received are just beautiful, and I for one can't wait to put them up for years to come!


Monday, December 14, 2009

Craft Boutique Tonight!!


We've been hard at work getting things ready for our first Craft Boutique! If you're in the Eugene area, come say hi and pick up a few Christmas gifts!

The Johnston Residence
5561 Excaliber
6-9 PM

Here's a sampling of what we'll have there:


Sushi Apron--our last apron in stock!


Onesies and Tees


Felted Earrings


Magnet Sets


Baby Blankies


Bobbi Pin Sets


Itty Bitty Boo-Boo Kits


Infant Car Seat Covers

AND MORE!!

Tuesday, December 1, 2009

December Give-Away Day: Win Fab Prizes from Max and Ellie!

Comments are now closed. Thanks to our 184 participants!! Our winners are....
K13--T-shirt or onesie of your choice
&
Handbagsbyjen--Boo-Boo Kit

We at Max and Ellie participated in our first Sew Mama Sew Give-Away Day in May of this year. We had such a fantastic response that we've been eagerly awaiting another Give-Away Day. And that day, my friends, is today!

This time around, we're offering not one, but TWO fabulous items from our shop! Our 1st Prize Winner will receive an infant one-piece or toddler t-shirt in a size and design of their choosing! All of our one-pieces and tees are made from super soft, 100% cotton. The designs are first fused onto the shirt, and then stitched on for extra durability, as well as a little pizazz.

Our 2nd Prize Winner will receive an Itty Bitty Boo-Boo Kit in whatever color they like best! These tiny first-aide kits are made from wool-blend felt and fabric-covered buttons, and they're teeny-tiny, so they easily fit in your purse or diaper bag. Their adorable colors and pinked edges make them super cute, and the adhesive bandages and antiseptic wipes they have inside make them super useful!

To enter, please visit our Etsy shop, Max and Ellie, and have a look around. Then come back here and leave a comment on this post telling us what items you like! Please include your email address in your comment. That's it! The contest will run until midnight on Sunday, December 6th. We'll randomly choose a winner and post the results bright and early on Monday, December 7th! Good Luck, and Happy Shopping!!

Friday, November 20, 2009

Shop Swap & Blog Partner: KeriAnne of Crafted by Design


Several months ago, I signed up the Shop Swap & Blog event, where bloggers with online stores traded wares and wrote up posts about the fantastic things they received from each other. I have to apologize to my partners for not writing up their posts sooner!

The first of my partners is KeriAnne, a mother of five who runs her business, Crafted By Design, with the help of her husband and kids. They make and sell lots of different crafts through their Etsy shop, including baby and toddler headbands, notebooks, crocheted caps, children's aprons, lovely jewelry, baby slings, homemade holiday cards, and turned wood pen and pencil sets!

I was lucky enough to get not one, but two amazing items from KeriAnne. The first is an adorable hot pink and black crocheted cap that actually fits both of my daughters. It is made of the softest yarn; I wish I had one in my size!

The second is a fantastic little black, hot pink, and silver clutch for mama! It is made from the same beautiful, soft yarn that the cap is made of, but it also had some silver running through it. So cute!

KeriAnne also has a blog--also called Crafted by Design--where she hosts give-aways and features items and shops that she loves.

Thanks for the goodies KeriAnne!

Wednesday, November 18, 2009

Sugared Pears


I was inspired by this project from Martha Stewart to make some faux sugared pears for my Brown Paper Package Exchange partner to display in her home during the holidays. They turned out stunning (I wish the pictures did them justice) and were fairly easy to make, but dear Martha doesn't give many directions for how to make them. So here are some tips to make this quick project even easier.
  • I used Elmer's Gel Glue because I read on some website that it works well with glitter. I wouldn't recommend it! Just use regular old white Elmer's or any white craft glue that dries clear. And water is down just a smidge to make it go on smoother.
  • Don't use a cheap brush. It might seem like a waste to use a nice paint brush on glue and fake pears, but it's better than picking stray bristles out of the wet glue once you start.
  • Get all of your materials ready before you start. Once you start on a pear, it is pretty hard to set it down without getting glitter everywhere, and you might never again be able to get a good grip on your fruit!
  • I tied some kitchen twine to the stem of each pear before I started, then used the twine to hang the finished pears from the shower rod in my downstairs bathroom while they dried. When they were dry, I just untied them from the shower rod and took the twine off the stems.
  • After much experimentation, I found that working from the bottom up gives the best results. Get a really good grip on the top third of the pear, then glue and glitter as much of it as you can without moving your hand. Then hold the pear by the stem to finish the top part.
  • Sprinkling the glitter with a spoon looks nice. So does gently pressing the gluey pear into the glitter.
  • Put your glue and glitter into disposable paper bowls. When you're finished, you can just throw away the bowl with the glue in it. And you can gently fold the glitter bowl in half and easily pour the leftover glitter back into the bottle.
  • Touch-ups don't look right, so just do it right the first time!
  • Do spray the dry, finished pears with polyurethane spray.
  • The directions for making the ombre glittered bells on the cover of this December's MSL are wonderful. Take a look at them.

Saturday, November 14, 2009

Easy Patchwork Scarf Tutorial


Someone special will be getting this lovely patchwork scarf in the mail soon! I was lying in bed one night having a hard time coming up with something to make for my partner for the Brown Paper Package Exchange. I had thought of and said no to a million different ideas, when finally something hit me like a thunderbolt. A patchwork scarf. I wanted to keep it simple and chic, so I avoided really cutesy prints, insanely bright colors, and an overabundance of fabrics stitched together. A few strips of fabric here, some taupe flannel there, and boom! A lovely, cozy, handmade scarf. If you'd like to make one too, keep reading!

Easy Patchwork Scarf
This scarf is a great way to use up scraps!

Materials:
  • background fabric, cut into the following pieces: two 4 x 6.5" pieces; four 2 x 6.5" pieces; three 12 x 6.5" pieces
  • six strips of accent fabric in coordinating colors, each cut to 3 x 6.5"
  • flannel for the back, measuring 63 x 6.5" total (I bought 1/2 yard of flannel and pieced together two 31.5 x 6.5" pieces.)
  • thread
  • sewing machine

Instructions:
  • Lay out your fabric strips in the following order from left to right: 4" background, 3" accent, 2" background, 3" accent, 2" background, 3" accent, 12" background, 12" background, 12" background, 3" accent, 2" background, 3" accent, 2" background, 3" accent, 4" background. When you are done laying out the pieces, it will look like a long, skinny 70 x 6.5" rectangle.
  • Sew the pieces together in the order in which you've laid them out. Use 1/4" seams.
  • Once all of the pieces of the top are sewn together, flip it over and press your seams open.
  • Piece together the flannel for the back of the scarf using the same method as you used for the top. Press the seams open.
  • With the right sides together, pin the two sides of your scarf together so that all of the edges line up.
  • Using a 1/4" seam, sew the two sides of your scarf together. Leave about 4 inches open so that you can turn your scarf right-side-out.
  • Trim the corners and turn your scarf right-side-out. Use a knitting needle or other pointy object to make sure the corners are nice right angles.
  • Press your scarf. Make sure both fabrics are folded in at the opening.
  • Starting with the area you left open, top-stitch around the entire perimeter of the scarf fairly close to the edge. Mine is about 1/8".
  • Done!

Wednesday, November 11, 2009

A Monstrously Fun Party!


A few months ago, I asked Addie what kind of birthday party she wanted this year, and she decided on a monster party. Addie's birthday is pretty close to Halloween, which would make that perfect for a monster party, except that her birthday is after Halloween. So, we tried to make our monster party very un-Halloweeny. Purples and greens, no ghosts or pumpkins, no spooky music. Just good old fashioned monster fun!

I made these invitations using my free trial of Adobe Illustrator, so I basically had no idea what I was doing! But I think they turned out pretty cute.


We danced to The Monster Mash and Purple People Eater. Addie is really into break dancing lately; she does great floor work!


I made coloring books for each of the kids by scanning all of the non-Halloween pictures in a $2 Halloween coloring book, and then printing them two-per-page and stapling the pages together. This kept them busy for a surprisingly long time!


After a dinner of pizza, salad, and green soda, we sang Happy Birthday to the birthday girl and ate the lovely purple and green monster cake.


Since this party was less than one week after Halloween, I didn't want to give bags full of candy to the guests as favors. And if the other children are anything like mine, they already have more cheap, tiny, throw-away toys than they need! Instead, I made them all monster t-shirts! And there were only 6 kids total, so it was easy and inexpensive.